

When I was younger, I remember watching my dad deftly handle a coconut, his hands moving with precision and confidence.
The sound of the husk cracking open, the sweet aroma that wafted out, and the joy of scooping out the creamy white flesh are memories that have stayed with me.
Now, years later, I understand that working with a coconut is not just about strength; you just need to understand some basic steps.
If you’ve ever stood in the supermarket, holding a coconut and wondering how to get from its rough, hairy exterior to the deliciousness inside, you’re not alone. I’ve been there too! It can be intimidating.
That hard shell, the mysterious water inside, and the uncertainty of what tools to use can make anyone hesitant.
But trust me, once you’ve mastered the basics of cleaning and prepping a coconut, it’s like riding a bike – you’ll never forget.
I want to take you on a step-by-step guide, through the process I’ve learned over the years. From choosing the right coconut at the store to the final moment of prying out that last piece of juicy meat.
1. Inspect Your Coconut

Choosing the right coconut is like setting the foundation for a house. A fresh coconut ensures that the effort you put into cracking and cleaning yields delicious results.
Firstly, the color is an indicator. A healthy coconut usually has a uniform rich brown hue without moldy or damp spots. These spots could be a sign of decay or infestation.
Then, give it a good shake next to your ear. Hearing the water splash inside is a great sign. It not only indicates freshness but also suggests the inner flesh is juicy and hydrated.
[Related: Top 8 Sour Foods You Probably Didn’t Know]
2. Brush Off the Fibers
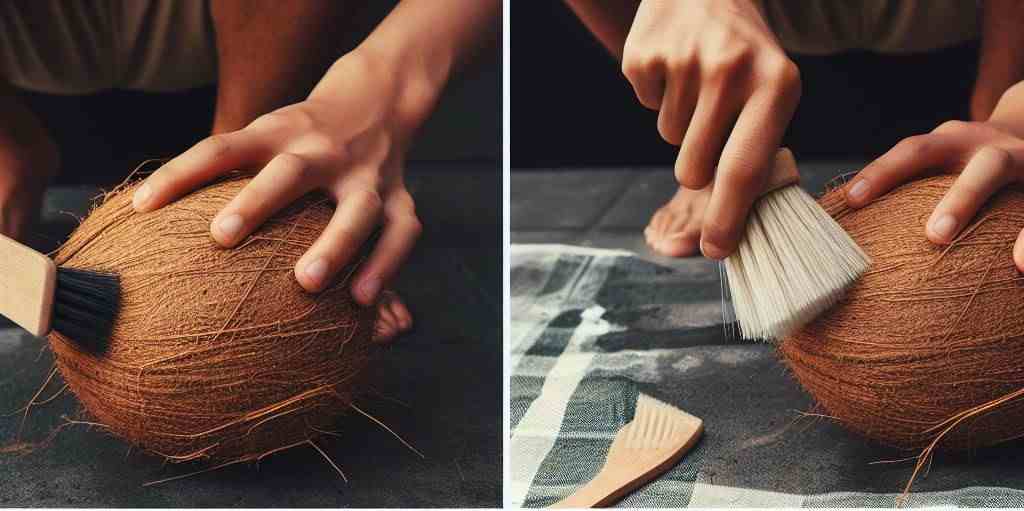
Coconuts, with their fibrous outer layer, can often trap a good amount of dirt and debris. Think about the journey this tropical fruit made to get to your kitchen! Before we crack it open, we need to ensure the exterior is as clean as possible.
A stiff brush is an ideal tool for this task. Scrubbing in a circular motion helps dislodge the tiny fibers and any accompanying dirt. This ensures that when you break the shell, there’s minimal risk of external contaminants sneaking in.
3. Rinse and Dry

After brushing, a thorough rinse is crucial. It helps wash away the residual dirt and any fine particles that the brush might have missed. Holding the coconut under cold running water, turning it around to cover all surfaces, does the trick.
Post rinsing, drying becomes essential. Not only does a dry coconut offer a better grip, which is crucial for safety, but it also prevents any water from interfering with the delicious coconut water inside.
[Interesting: 8 White People Foods You Should Know]
4. Locate the ‘Eyes’
Nature has provided coconuts with a quirky feature: three “eyes” at one end. These aren’t just for aesthetics; they’re the most accessible points on this hard-shelled fruit.
The eyes are slightly softer than the rest of the shell, making them a strategic starting point for accessing the inner contents.
5. Drain the Water
Before we go about splitting the coconut wide open, there’s the delightful task of draining its water.
Puncturing the previously identified eyes with a clean tool allows the clear, nutrient-rich coconut water to flow out. Collecting this in a bowl or glass serves a dual purpose: preventing potential mess and securing a refreshing treat.
Whether consumed straight up, or used as an ingredient, coconut water is packed with electrolytes and offers numerous health benefits.
[Read: 5 Foods That Naturally Staves Off Dementia, According to Science]
6. Break It Open

Splitting a coconut might seem like a task for the mighty, but it’s more about technique than strength. In fact, I’ve got six methods for you to try out. You can use anyone that suits you best.
i. Tap Method
Many prefer this method for its simplicity and control.
Tools Required: A hammer or the blunt side of a heavy cleaver.
Procedure:
First, you’d want to grip the coconut firmly, ensuring the ‘eyes’ are facing downwards. The idea is to apply even force around the coconut’s equator by tapping it continuously while turning.
You’d need patience as the initial cracks might be minor, but with continuous tapping, these cracks will grow and eventually split the coconut in half. This method offers a relatively neat break, making it easier to access and remove the flesh.
ii. Oven Method
This method uses heat to soften the shell, making it more brittle.
Tools Required: Oven.
Procedure:
Start by preheating the oven to 400°F (200°C). Place the coconut on an oven tray to catch any leaking coconut water. After baking for about 10-15 minutes, remove the coconut using oven mitts.
The shell will be brittle and can be tapped gently to crack it open. The heat also loosens the flesh, making it easier to separate from the shell.
iii. Freeze and Thaw
Expanding and contracting can cause the shell to crack.
Tools Required: Freezer.
Procedure:
The coconut goes into the freezer for a full night. The water inside freezes, expanding and stressing the shell.
When you take it out the next day and let it thaw, the contraction coupled with the previous expansion may cause the shell to develop cracks. If not, a gentle tap can do the trick.
iv. Drop Method
A more primal approach, but effective nonetheless.
Tools Required: A sturdy surface, preferably concrete or stone.
Procedure: Holding the coconut at about head height, drop it onto the hard surface. The impact often results in the coconut breaking into multiple pieces.
A word of caution, though: this method is less predictable and can get a bit messy, with the coconut water potentially splashing.
v. Saw Method
This method is all about being super accurate and on point.
Tools Required: Handsaw.
Procedure:
By gripping the coconut securely (using a vice or even just a towel for grip), you can saw around its equator (centre of the coconut). It requires effort but results in a very controlled and clean break.
This method is particularly useful if you’re presenting the coconut in a culinary setting and need it to look neat.
vi. Drill and Pry
For those who like to work meticulously.
Tools Required: Screwdriver, hammer.
Procedure:
Begin by creating holes around the coconut’s equator at regular intervals using the screwdriver and hammer.
Once you’ve got these punctures in place, insert a butter knife or another prying tool into them. Gently wiggle the tool to widen the cracks. Continue around the coconut, and it should eventually break open.
These methods are more than just ways to access the inside of a coconut; they’re a blend of tradition, science, and practicality. Whether you’re in a modern kitchen or a tropical beach, there’s a method suited for every scenario.
[Also read: 8 Harmful Foods People Love to Eat]
7. Separating the Shell

The white flesh, or the endosperm, is the prized part of the coconut. But it’s snugly attached to the shell. To extract it, here are some simple steps for you:
i. Prepare the Coconut: After you’ve opened the coconut, drain the water. It’s easier to work with a coconut that’s devoid of its liquid.
ii. Heating (Optional but Effective): Briefly place the halved coconut in an oven preheated to 350°F (175°C) for about 10-15 minutes. This step isn’t mandatory but makes the separation process smoother. The heat loosens the bond between the meat and the shell.
iii. Use a Butter Knife or a Flexible Paring Knife: Slide the edge of the knife between the meat and the shell. Your goal isn’t to cut the meat but to use the knife as a lever. Start near one of the edges, gently pushing the knife further under the meat, and prying it away from the shell.
iv. Work in Sections: Instead of trying to remove the entire piece of coconut meat in one go, focus on sections. This minimizes the risk of breaking the meat and makes the task more manageable.
v. Be Patient: You might encounter areas where the meat seems stubbornly attached to the shell. Don’t force it; instead, approach from a different angle or try loosening a neighboring section first.
vi. Rinse and Store: After you’ve successfully separated the meat from the shell, rinse it to remove any residual shell fragments. Store the fresh coconut meat in the refrigerator if you’re not using it immediately. It should be consumed within a few days for the best flavor and texture.
8. Storing the Coconut
Fresh coconut, once opened, has a limited shelf life. If you’re thinking of using it within a week, refrigeration is the best bet. An airtight container helps in ensuring the coconut remains fresh and doesn’t absorb other fridge odors.
But if you’ve got plans further down the line, it’s better to freeze it. Grating or chopping the coconut into the desired size and storing it in freezer-friendly containers ensures you have a stash ready for future culinary adventures.
Remember to label with the date, as even in the freezer, the coconut has an optimal usage time for freshness.
FAQs
1. How do I get the water out of the coconut?
Before anything else, you’ll want to drain the coconut. The easiest way? Locate the three “eyes” on one end of the coconut. They’re the little dark spots that look like bowling ball holes.
Using a skewer or screwdriver, poke a hole through two of them. Flip the coconut over a bowl or cup, and let the water pour out. You might need to give it a shake or two to get all the water. The water is delicious and nutritious to drink.
2. What’s the easiest way to crack open a coconut?
After draining the water, you have a few options to crack it open. One common method is the “tap technique.” Hold the coconut in your palm and tap it around the middle with the back of a knife or a hammer.
Rotate and continue tapping. After a while, you’ll see a crack forming, and it will split open. You’re not trying to smash it – just consistent, gentle taps while rotating should do the trick.
3. How do I get the coconut meat out?
Once your coconut is open, if you want to remove the meat in larger pieces, a quick trip to the oven can help. Warm it up at 350°F (175°C) for about 10-15 minutes. After that, use a butter knife to slide between the shell and the meat, prying them apart.
Work patiently, and try to tackle it in sections rather than aiming to remove all the meat at once. The heat from the oven typically helps in loosening the meat, making the process easier.
4. Any tips for storing fresh coconut meat?
Once you’ve separated the coconut meat from the shell, give it a quick rinse to get rid of any tiny shell fragments. If you’re not planning on using it immediately, store it in an airtight container or a sealed plastic bag in the refrigerator.
Fresh coconut meat has the best flavor and texture when consumed within a few days. If you need longer storage, consider freezing it. Just ensure it’s properly sealed to prevent freezer burn.